Latest Articles
Showing posts with label XP Tweaks. Show all posts

How To Display Control Panel As Menu In Windows XP


Here is a simple method to display Control Panel as Menu in Windows XP. It saves time as we can directly open file/folder from Control Panel without opening it.

Have a look :

Method : Simply right click on Taskbar and select Properties, click on Start Menu at the top menu bar and put a check on Start Menu and then click on Customize. Now select Advance in the top menu bar and under Control Panel put a check on Display As A Menu and click on OK. Now press Apply and then OK.

Now view Control Panel in start menu. Simple !

Windows 7 Boot Screen For Windows XP


Windows 7 is the next version of Microsoft Windows. Its a code name for Blackcomb and Vienna. Here is a boot screen of Windows 7 for Windows XP.


Have a look :


Download Instructions : Click here to download

How to apply boot screen : You can use 2 method to change the boot screen :

1) Manually changing the boot screen
2) Changing boot screen using Tune Up Utilities

Credits : This boot screen is developed by Vishal Gupta.
Image Credits : Thanks to Vishal Gupta

Disable Wallpaper Change When Applying A New Theme In Windows XP


I am writing about registry tweaks after a very long time. Whenever you change Windows XP Visual Styles the wallpaper automatically changes. Not only wallpaper, the icons, fonts and other settings also changes automatically and resets to default.

Here is a trick to prevent the change of wallpaper when applying a new desktop theme.

Lets start :

Just download this .reg file and double click on it. It will ask you for your decision. Click on Yes and you are done.

If you want to reverse the change simply run the undo.reg file.

Actually the above file is a .reg file the includes the code to edit the setting in the registry. To view the code simply right click on the file and select Edit.

Folder Background Images in Windows XP : Add Any Image To Folder Background Using Isswe


Last time I wrote about a method with which you can change your folder background to any image you want. But unfortunately this method does not works on all Pc's.

Here is a simple application known as Isswe which will do all the work for you in just a single click of a button.

Just run the set up and select your image for background and you are done.

Have a look :


Download Instructions : Click here to download.

How To Change Name Of Second Window In Dual Boot


If you have installed 2 Windows in your system and want to change the name of Windows when system boots, here is the method.

First search for boot.ini file in C drive. You can use this simple search engine to search fast and easily.

Open boot.ini file with Notepad and you can make changes by editing Microsoft Windows XP Professional to whatever you want. I named my first Windows as Pinkie and second as 84Productions.

Have a look at my system :

Before Editing :

Click on the image to enlarge

After Editing :


More Windows tricks here.

Folder Background Images in Windows XP : Add Any Image To Folder Background


Here is a simple tutorial with which you can add any image to your Folder Background. This tutorial works for Windows XP only. You can modify any folder you want, in simple 5 steps given below.

Not only Folders you can also add cool images to your C,D or E Drives also. Just give it a try and I am sure you will like it.

Have a look :


Here is a step by tutorial :

Step 1) First make a new folder in which you want to add background. For explanation I take a folder as Gagan.

Step 2) Now open Notepad, copy and paste the following code in it.

[ExtShellFolderViews]
{BE098140-A513-11D0-A3A4-00C04FD706EC}={BE098140-A513-11D0-A3A4-00C04FD706EC}
[{BE098140-A513-11D0-A3A4-00C04FD706EC}]
IconArea_Image=path of the image

Step 3) Now in the IconArea_Image just enter the path of the image that you want to set a background. If the image is in the same folder then no need to give the path simply enter the name of the image along with the extension i.e

IconArea_Image=background.jpg

Step 4) Now save the notepad file and name is as Desktop.ini

Step 5) That's it ! Just open you folder and now you can see the folder with the selected image as background.

If this method is not working click here to see the alternative method.

Explorer Breadcrumbs : Enhanced Navigation For Windows XP


You might have seen the explorer bar at top of Windows Vista. This helps in easy navigation to files and folders. You can get the same explorer bar in Windows XP with the help of Explorer Breadcrumbs.


Explorer Breadcrumbs is an add-in for Windows Explorer which contains a contextual series of buttons that allows you to quickly see and navigate through the entire folder hierarchy without leaving the current window.

Features:
  • Saves time navigating through folders and files
  • Seamless integration with Windows Explorer
  • Changes appearance along with Windows themes

Download Instructions : Click here to download

Right Click Tweak : Add Turn Off, Restart & Log Off Options


With this simple tweak you can add Turn Off, Log Off and Restart option to your Windows XP and Vista whenever you right click on My Computer.

Just download this file and double click on it. It will ask for your permission to add this tweak into registry. Click on Yes and from now whenever you will right click on My Computer you will see the 3 options.

Download Instructions : Click here to download registry file.

Note : This registry hack works both on Windows XP and Vista.

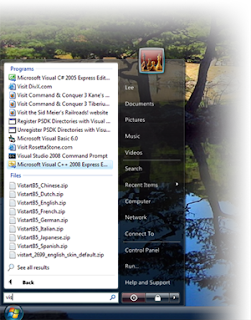
ViStart : Change Your XP Start Menu Like Windows Vista


When Windows Vista came, I was very excited to see its new features and graphics. But after using it for 2-3 months I switched onto Windows XP. There are many excellent features in Windows Vista that we like to see in XP too and one of that feature is Start Menu.

I really like the Start Menu of Windows Vista and especially that search option at the bottom. Now you can get the same Start Menu in XP too with the help of ViStart.

ViStart is a perfect start menu replacement for Windows XP. ViStart will now index all personal files and program files and give *ACTUAL instant results* that's 4 times faster then the real Vista start menu....

Download Instructions : Click here to download ViStart.

Click here
to know more about tweaking Windows XP.

Sage Thumb : Customize Your Right Click [ Amazing Software For Free ]


Old Is Gold : Sage Thumb is a quite old application that is used to customize Right Click in Windows XP.

Though the software is old but I hardly find in on Google, that is why I am sharing it with you all.

Here is the screenshot, have a look :


Download Instructions : Click here to download.

If you have such rare applications to share, you are most welcome.

Create Your Own Autoplay Menus For Windows XP Vista And All Other Multimedia Applications


In my last posts I told you about Tweaking Windows XP and now I am going to tell you that how can create your own auotplay menu for Windows XP and Windows Vista.

Few months back I was planning to make my own unattended Windows XP version but due to my exams I dropped that idea.

You might have seen many unattended Windows version like Crystal XP, Windows XP Dark Edition, Black Edition Windows XP and alot more...

You might have seen the beautiful autorun menu of that CD's !! No ??

Have look here :

Autorun Menu For Crystal XP :


Autorun Menu For Windows XP Dark Edition :


So how is the look ???

Want to create such beautiful autoplay menu ?

You might be thinking that it is very difficult to create it but you are totally wrong. With Autoplay Media Studio you can create such menus very easliy.


Some features of this appication :

>> Create your own custom autorun menus, interactive presentations, multimedia applications, and custom software in just minutes

>> You can easily add images, music, video, flash, text, and more, by a simple drag n' drop option.

>> No need of any programming language.

Download Instructions : You can download this application from their official website www.indigorose.com.

If you are facing any problem in using this application feel free to contact me.

How To Change Windows XP Set Up Look


Whenever you intall Windows XP and installation starts, a boring blue screen appears and your installation continues.


Is'nt that really a boring screen ?? But what if I say you can change this all to your own screen and text. :d !!

Yes it is possible !! See this screenshot of the hacked version of Windows setup ;


So hows the new look ???

In this post I am going to tell you that how you can add your own images and text. So lets start.


Requirements :

For this tutorial you will need 4 things :

1) Windows XP CD
2) Resource Hacker : You will get it in the next of my post.
3) Winrar : Google is you can get it easliy.
3) The image you want to replace

Now lets start :

>> This hack requires a little knowledge about Resource Hacker. If you are new to it just read this tutorial on All About Resource Hacker.

>> Now I start this tutorial thinking that you know the basics of Resource Hacker.

>>Just download the Resource Hacker and insert your XP CD into your CD ROM.

>>Now search for the Winntbbu.dll file in it. If you do not find it then search for WINNTBBU.DL_

>>When you find this file open it with Winrar it and extract Winntbbu.dll from it.

>>Now in Resource Hacker open that Winntbbu.dll file.

>>Now in the left hand side panel go to Bitmap >> 103 >> 1033

>>Right click on 1033 and replace it with your image.

Note : Make sure that your image should be in .bmp format

For help see this screenshot :


>>If you want to change the text you can change it by going to String Table

Just go to String Table and click on 1 and change the text you want and then click on Compile Script. This way you can change all your text from 1 to 63

See this screenshot, how I changed the text :

Before changing the text :


After changing the text :


>>Now save the file.

>>Now the saved file is in .dll format and we have to change it to .DL_

>> So to change it we again require Winrar.

>>Now right click on the file and select add to archive... and change the name from Winntbbu.rar to Winntbbu.DL_ and click OK.

See this screenshot for help :


Now replace Winntbbu.DL_ in your CD with this file and make a bootable CD. And from now when you will install Windows your new image will be displayed as background.

If you do not know how to make a bootable CD, read this post on how to make a bootable CD

How To Increase The Size Of C Drive : Windows XP


When ever you install any program, by default it gets installed in your C drive thus reducing the size of C drive. And when it is filled users start getting annoying balloon messages at the taskbar saying Memory is too low....

So to overcome this problem here is the solution to it :


>> Go to your D or E drive and create a New Folder and name it Gagan.

>> Now press Windows+R and type diskmgmt.msc and hit Enter.

>> A new Window will pop up named Disk Management.

>> Right click on (C:) and select Change Drive Letters and Paths. For help see this screenshot :


>> Now click on Add and browse to the Gagan folder created in first step and click OK. For help see this screenshot :


Thats it !! Now size of the C: drive is increased and in future you will not get any message about low disk space.

Date Cracker 2000 !!


Date Cracker 2000 is a program which removes the date protection from programs which expire after a specific date. It is most useful for shareware or trial versions of software. Another interesting software developed allows you to remove passwords from MS Access '95 or '97 MDB files.

Note : This program should be used for educational purposes only.


Download Instructions : Visit their official website to download this application.

If you like this post, Do leave a comment.

All Drive Icons Gone ? What To Do ??


Yesterday all my drive icons dissapeared suddenly.I scanned my computer with Kaspersky Anti Virus and Super Anti Spyware,few infections were found in C drive and were fixed also but my drive icons did not come back.Then I scanned my regsitry and made some changes to it to get all my icons back.

To fix all the drive icons ,do the following steps :


>>First get any .ico files that you want to display as your drive icons.Say that icon file is gagan.ico and put in it in C:\WINDOWS\Icons.
>>Then open Start and click on RUN.
>>Type regedit in it and press Enter.
>>Registry Editor will open.
>>Open HKEY_LOCAL_MACHINE>>Software>>Microsoft>>Windows>>CurrentVersion>>Explorer>>DriveIcons

And under DriveIcons you will see names of your drives example C,D,E...

Suppose if your D drive icon is gone just go to DriveIcons and double click on it.

In the right hand side panel, right click on default and select modify and put in the path of your drive icon.
For example :
C:\WINDOWS\Icons\gagan.ico

See this screenshot :


click on the image to enlarge


Note: Make sure that your icon should be be of .ico format.Otherwise your icon will not be displayed.


Screenshot of my drive icons :


click on the image to enlarge


Download My Drive Icons : Click here to download.


How To Make Your Desktop Look Sexy Cool And Awesome


There are many user who keeps on writing to me about How to customize desktop !!

So here I am going to tell you that how you can customize your desktop and can win exciting prizes.Yes you can also win prizes with the sexy look of your desktop.Wanna know how?? That I will tell you in my next posts so keep visiting..

Screenshot Of My Desktop :


click on the image to enlarge


How to give a makeover to your desktop :

Here is a list of top 3 applications that will give a new and sexy look to your desktop

  1. Window Blinds
  2. Rainmeter
  3. Object Dock Plus

Window Blinds :

About The Software : WindowBlinds is a one-of-a-kind utility that allows Windows users to completely change the look and feel of the Windows interface by applying a new skin.
To know more about this product visit this website

Download Instructions : You can download the full version from http://katz.cd

Additional Skins : To get cool skins of Window Blinds visit http://customize.org

Rainmeter :

About The Software : Rainmeter is a customizable performance meter, which can display the CPU load, memory utilization, disk space, network traffic, time and many more things.

Here are some key features of "Rainmeter" :

  • Freeform skins
  • Supports Windows transparency
  • Plugin system for 3rd party support
  • Anti-aliased drawing routines
  • Works also as Litestep plugin
  • Has ability to hide on mouse over
  • Can stick to the desktop (i.e. doesn't hide with Show Desktop)
  • Skins can react to mouse events
  • Multiple skins can be ran at the same time
  • Can be controlled from 3rd party applications with !bangs


Download Instructions : It is a freeware application and you can download Rainmeter from here.

Additional Skins : You can also download Rainmeter skins from here.

Object Dock Plus:

About The Software : ObjectDock™ is a program that enables users to organize their shortcuts, programs and running tasks into an attractive and fun animated Dock. By allowing users to have more control over how they organize their desktop, users can take control of their desktop icons and shortcuts to have them be available when where and how they need them. This, all with the unique style and top-rate performance that ObjectDock is known to deliver!

Download Instructions : You can get this application free and full version from http://katz.cd


If you have created any new skins or want to share any of your stuff with us, you are most welcome

Change Progress Dialog Box Using Resource Hacker


People using Windows Vista may be familiar with the new look of the Progress Dialog Box.It really looks nice.Now XP users can also get that look without any software but just following my steps.In this tutorial I am going to tell you that how you can replace the Progress Dialog Box in XP from old XP style to new Vista Style.

Old XP style :


click on the image to enlarge


New Vista Style :


click on the image to enlarge


Instructions :

Before doing anything you will need to know about Resource Hacker.(click here to know all about Resource Hacker).

Now,as you know about basics of Resource Hacker.So lets start :

In this tutorial we have to do 3 things :

Replace Script

Replace AVI's

Add BMP Image


1)Replacing Script : Here we will replace the original script with new created script.

>>Open shell32.dll from %windir%\System32\Shell32.dll in Resource Hacker.

>>Then goto Dialog>>1020>>1033 and replace the code in Right Hand Side Panel to the code given below :

click here to download the code.Just copy it and replace it and press Compile Script

See this screenshot :


click on the image to enlarge


2)Replacing AVI's : Now you have to replace AVI's.Follow the steps given below :

First download these 3 AVI's.(click here to download).It's a RAR archive so you will need WINRAR to open it.

Now in Resource Hacker goto AVI and replace AVI's as given below..

Goto AVI>>160>>1033>> and replace it with 160.avi (just downloaded)
Goto AVI>>161>>1033>> and replace it with 161.avi (just downloaded)
Goto AVI>>162>>1033>> and replace it with 162.avi (just downloaded)
Goto AVI>>163>>1033>> and replace it with 162.avi (just downloaded)
Goto AVI>>164>>1033>> and replace it with 162.avi (just downloaded)

3)Adding BMP : It works as the background image.You can also change its colour and then add.

First download the BMP from here and extract it.

Now in Resource Hacker click on Add A New Resource.After that a new window will pop up,in it click on Open File With Resource.

Now navigate to the BMP file you just downloaded and open it.

In Resource Name type 404
In Resource Language type 1033 and click Add Resource.

Click on SAVE and your are done !!

If you are facing any problem in this tutorial do comment here I will reply as soon as possible.

Create Your Own Fonts !!


You might have seen numerous fonts available on internet and wish to design new fonts yourself but did not knew from where to start.

No problem I'l tell you about a website with which you can create your own designer fonts easlily without any third party application but you can create it online ... :)


Screenshot :


click on the image to enlarge


Requirements :

You will need Adobe Flash Player 9 to run this website.


Visit and enjoy : click here to visit that website.

What more you can do with these fonts :


>>You can then install these fonts in Windows and MAC also.

>>After designing your own fonts you can install that fonts in your mobile also.
Read this post about installing new fonts to mobile.

Repair Flash Drive Within Seconds


Sometimes it happens that whenever you plug in your Pen-Drive or MP3 Player in USB(Universal Serial Bus) ,you are unable to access your drive and your system gets hanged when u click on the drive to access it.Its not because of bad sectors in your drive always, it is due to the Memory Pool Corruption.

How To Repair It


Plug in your drive to the USB port and restart your computer.When your system will boot up after shutdown it will run checkdisk on your flash drive.Let it run !!

After the system boots up completely you will be able to access your drive !!

Get All Missing .DLL Files !!!


Due to virus or spyware some of your .DLL files gets corrupted or gets deleted and whenever you switch on your PC error comes xyz.dll file not found.

Here you will find the most common files that may be missing or corrupted on your computer. Feel free to download at no cost !!


http://www.dll-files.com/

http://www.windll.com/